Monday, 29 December 2008
T8
Hey guys made them changes 2 t8 sorry taking so long but with being sick n then xmas nly got around 2 it.
Monday, 22 December 2008
Thursday, 18 December 2008
Therapeutic Videos
Managed to shrink the video files - I don't have to post dvd's now...
The videos are beginning to appear on you tube channel "superhoofy" now:
Justin's demo of T1 - Ive made this video public - to help you find the channel "superhoofy"
The rest of the videos will remain private - follow the instructions in the right hand column to access these....
The videos are beginning to appear on you tube channel "superhoofy" now:
Justin's demo of T1 - Ive made this video public - to help you find the channel "superhoofy"
The rest of the videos will remain private - follow the instructions in the right hand column to access these....
Wednesday, 17 December 2008
Saturday, 13 December 2008
Group 7 Christmas Party
hey all.i assume everyone is available for tuesday nite saying i havent heard anything.TGI Fridays has been booked for 8.00pm.Feel free to bruing a few christmas crap to put round the table.they restaurant r doing a bit but we have to bring r own stuff in to.Also everyone should have their secret santa thing sorted.remember that it cant be over £3.lol.Any questions about tuesday nite either put on blog or email me on smccarter060@hotmail.co.uk.
Cheers
Stewart
Cheers
Stewart
Friday, 12 December 2008
The next meeting
For anyone who wasn't @ uni yesterday, the saturday meet has been moved to Monday 11am till 1pm so that more people are available to come. Thanksxxx
Thursday, 11 December 2008
Video Files
Did gareth or anybody manage to get the video files ? - can he or whoever has the camera ensure the video camera is available for and kept busy at saturday mornings group meet. I might missthis Saturday.
Also can everyone make sure they have had their therapeutic case study videoed by next Tuesday.If you havent been videoed or your video was not correct - you will know who you are.
Ill burn cd copies next Wednesday. Ill have them for the last meeting next Thursday. If your not in next Thursday meeting - please email robert.penman@northumbria.ac.uk and Ill arrange to get you a copy of the files.
Wednesday, 10 December 2008
T11 Scenario...new one!!!
Hope this one is better...
Scenario 11
A 35 year old female with multiple sclerosis has weak lower limbs. She uses elbow crutches indoors and a wheelchair for outdoor mobility.
Teach this patient a simple active/active assisted exercise regime (using a mat on the floor) to help maintain range of movement, flexibility and strength in the lower limb. (Focus on the hips and knees).
1. Explain to your patient that you are about to do some simple leg exercises to help strengthen their knees and hips and increase the amount they are able to move. Get their consent!!
2. Explain that if they feel tired or in unbearable pain during the exercises they should let you know and you will either take a break, proceed to less strenuous exercises or stop doing exercise altogether. It is very important patients with MS do not overdo it as they could strain an already compromised muscular system. This leads to further pain and the body and mind being overtired and overworked. MS sufferers also a very sensitive to heat, so ask them to tell you if they feel too warm and it will make their symptoms worse.
3. Ask the patient to lie down on the mat and assist them if necessary. (You could ask your physio assistant to help with this). The assistant is also able to demonstrate exercises if needed. Before you start, you could quickly demonstrate the exercises on the mat so the patient knows what to expect and also to make it easier for the patient to see the demonstration.
4. With the patient laid flat on their back, ask them to bend and bring their right leg up towards their chest using both hands. To actively assist, support their knee joint and apply gentle pressure to the leg to assist in the hip flexion and increase the range of movement. Hold for 5 seconds and release back to full extension. Repeat 3-5 times and then do the same for the left leg.
(If your patient’s muscles go into spasm then they will not be able to begin with their legs flat and stretched out. They will lie with their knees bent and feet flat on the mat).
5. With the patient still laid on her back, ask her to bring her knees up so her feet are flat on the mat. Knees should be around 30 cm apart. Ask her to roll her knees over to the left, stretching diagonally across the trunk. Gently assist with this exercise, making sure you do not straight the patient. Bring the knees back to the middle, then roll the knees over to the right and back to the middle again. Make sure both shoulders stay in contact with the floor or bed. Repeat 3-5 times each side. Make sure the patients knees do not flop over and don’t rush. This helps strengthen the muscles used for internal and external rotation.
6. Return patient to lying position with knees bent and feet flat on floor. Ask her to lift her buttocks up of the floor as high as she can. You could possibly explain that she needs to tighten the muscles as if she was squeezing her buttocks together like they are squeezing a ball. As she raises her hips, support her with one hand above and one hand below and help her push upwards if needed. Guide her so that she moves straight up and down and does not waver from side to side. Repeat 3-5 times.
7. Return patient to lying position with knees bent and feet flat on floor. Ask her to tighten her tummy so that she tilts her pelvis to flatten her back down onto the mat. Ask her to hold for 5 seconds and then release. You may need to assist the first couple of “pelvic tilts” with your hands so that the patient gets an idea of how it feels. Repeat 3-5 times.
8. Lie patient flat again and ask them to flex their knee and lift their right leg. Ask them to circle their leg in the air, fairly slowly so that it is a controlled movement. Assist by holding their knee and foot as this exercise is difficult to do with any muscle weakness and so they will need a lot of guidance and support. Do 5 circles with each leg, allow the patient to get their breath back and rest if they are tired. Then repeat.
9. Although the question asks to mainly focus on the hips and knees, it might be an idea to do an exercise for the arms to show you have thought about this aspect too (only if you have time though). In the same lying position, ask her to lift her right arm upwards in a straight line (sagittal plane) so that it points to the ceiling. Slowly lower the arm and repeat 3-5 times and then do the same with the left arm. Support the arm at the elbow as you do this.
10. If your patient is able to turn to lie on their side (the likelihood is they will be able to in the exam so its worth doing this – however make it clear that they can stop if they get tired or if its difficult etc so its more realistic) then you can assist them in exercises on their side. You may need to help with the turn: bend both knees and ask them to turn their head. Then guide their body over as they twist their knees over to the side. An exercise you can do is to ask them to lift their hip up to the ceiling (abduction). It doesn’t have to be a big movement, just allow them to go as far as their ROM allows. Repeat 5 times on this leg.
Then you can do (if you have time) another exercise on this side before turning over. This is to extend the underneath leg at the knee and hip and flex the other leg on top so that it crosses over in front. The patient can then lift their underneath leg slightly off the ground 5 times. You will need to support and stabilise their leg and body as you do this. If they need extra support, use your assistant as well.
Once completed, assist the patient in turning to their other side to complete the exercises on their other leg.
11. If your patient is able to lie on their front, ask them to lift their legs individually up to the ceiling to work their extensor muscles. Do each leg 5 times.
WEBSITES to look at:
http://www.mstrust.org.uk/downloads/exercises.pdf
http://www.webmd.com/multiple-sclerosis/guide/multiple-sclerosis-exercise
Assist the patient to get into the wheelchair from the floor and then teach a relative of the above patient how to ascend and descend a kerb with the wheelchair.
Your patient will be laid on their back so it may be an idea to assist them in sitting up so you can demonstrate the motion from the floor to the chair. Before you begin, check that your client has a stable chair they can get into at home.
Pull up a mat and the chair next to the patient’s mat. Lie on the mat as the patient would and bend your knees up so your feet are flat on the floor.
Turn your head to the right/left (whichever way you are going) and turn your knees the same way. Bring your arm on the outside over to help you turn.
When you are on your side, use your upper body strength to push up and turn over so you are knelt forwards on your hands and knees.
Shuffle around on your hands and knees to face the side of the wheelchair. Remove the side of the chair you are facing.
Put both hands on the far arm of the chair for support and kneel up on the knee next to the chair.
Push up with your leg enough to sit of the corner of the chair. Explain to the patient that they must not push down all their weight onto the chair and to use their legs as much as possible.
Once sat on the corner of the chair, shuffle round to the middle and replace the side of the chair.
Make sure whilst doing this your assistant is holding the wheelchair still as we all know the brakes can be a bit dodgy.
Now let the patient try the manoeuvre. Things to make sure you do are:
Keep close to the patient so you can support if he/she struggles with the process.
Guide the patient’s knees over if they need assistance.
Give the patient constructive feedback if they are not quite doing it right as the examiner will be looking for this. If necessary guide the patient.
Make sure your assistant is available to support the dodgy wheelchair.
Once in the wheelchair, your assistant turns into the carer/relative. Firstly demonstrate how to guide the wheelchair up and down stairs.
Explain the importance of good posture and not lifting the chair with your arms to the carer.
When taking the chair up the stairs, position the chair close up to the step so that the front wheels are next to the step and you are not approaching from an angle.
Put your foot on the tipper and guide the chair forwards to rest the front wheels on the step.
Get a good grip on the handles and keeping a straight back push the handles to lift the patient’s back wheels up onto the step. DO NOT LIFT!!! If you are weaker like me then you should get as close to the back of the chair as possible and use your body weight to help in moving the chair up the step. Even resting your knee against the back of the chair can help.
Bringing the chair back down, you should go down backwards the way you came up. Move the back wheels to the edge of the step and pull back gently and slowly to lower the large wheels to the ground.
Using the tipper, tip the chair up to lift the front wheels off. Keep one leg behind as it keeps your balance better as you move the chair backwards to clear the front wheels. Once cleared, slowly lower the chair keeping your foot on the tipper to support the weight.
Give the chair to the carer. Watch carefully what the carer does and give comments as to their posture and positioning and technique if needed, until they can perform the manoeuvre safely.
Analyse the activity involved in self propelling the wheelchair, with particular emphasis on the left shoulder (glenohumeral joint) and the left elbow.
Functional Analysis
Before you start, check your model is suitability clothed so you can see their movements clearly. Check they know what they are going to do!
Watch the model perform several cycles of the four stages in the wheelchair. Watch the motion from different angles and as the model to perform it in normal and slow motion.
Split into four phases
Start position
Preparation for push
Push
Recovery phase
1. Starting position:
MOTIONS:
The left glenohumeral joint is slightly flexed and abducted in the wheelchair on the armrests. The elbow joint is flexed at around 80 degrees on the armrest depending on the patient, this is a judgement call.
MUSCLES INVOLVED:
There are no muscles contracting as the client is relaxed.
BASE of SUPPORT and COG:
The base of support is good as all four wheels are on the floor with a large surface area on the floor and the body is sat back in the chair. The LOG is down the centre of the body and the centre of gravity is central. The patient is well balanced.
FORCES:
Gravity is acting down on the chair. There is friction between wheels and the floor preventing movement of the wheels.
2. Preparation for push
MOTIONS:
The glenohumeral joint extends, abducts and medially rotates (inwardly). The elbow joint flexes to around 110 degrees depending on the client. Extension/flexion occurs in the sagittal plane, abduction in the coronal plane and rotation in the transverse plane.
MUSCLES INVOLVED:
Extension of shoulder: Posterior deltoid, Pec. Major. (Concentric contraction)
Abduction of shoulder: Middle deltoid, Supraspinatus. (Concentric contraction)
Medial rotation of the shoulder: Anterior Deltoid, Pec. Major, Teres Maj.
Flexion of elbow: Bicep (Concentric contraction)
BASE of SUPPORT and COG:
BOS still large as all wheels are on the ground. Client BOS is the same as they are sat back in the chair. The COG is further back in the body and the client’s weight is further back.
FORCES:
Friction between the wheel and the ground. Gravity acting on the chair.
If client is sat further back there will be more friction on the back wheels than the front as there is a larger downward force acting on the wheels at the back. There is friction between the hand and the wheel rim depending on how hard the client is applying a force. There is gravity acting down on the patient as they lift their arms.
3. Push
MOTIONS:
The glenohumeral joint flexes through neutral position to in front of the body and the elbow joint extends fully. The shoulder joint adducts and laterally (outwardly) rotates. Flexion/extension are in the sagittal plane, adduction is in the coronal plane and rotation is in the transverse plane.
MUSCLES INVOLVED:
Flexion of shoulder: Anterior deltoid, Coracobrachialis (Eccentric)
Adduction of shoulder: Pec. Major, Lat. Dorsi, Coracobrachialis (Eccentric)
Lateral rotation of shoulder: Posterior deltoid, Teres Min., Infraspinatus.
Extension of elbow: Triceps (Eccentric)
BASE of SUPPORT and COG:
BOS is the same regarding the wheelchair on the floor, but is smaller between the body and chair due to the client being sat further forwards in the chair. The clients weight is further forwards so the COG is further forwards.
FORCES:
Friction between wheels and ground as the chair moves. Gravity acting down on client and chair. Patient has to act against friction to create a larger force to build momentum. Friction between the client’s hands and wheelrims.
4. Recovery Phase
MOTIONS:
The glenohumeral joint abducts, medially rotates and fully extends to return to original position. The elbow flexes again. See planes as above.
MUSCLES INVOLVED: see phase two.
BASE of SUPPORT and COG:
BOS increased between the body and chair as the buttocks have more contact with the chair now the patient is leaning back again. COG is more central as the body is sat more upright.
FORCES: Friction slows the chair down as the hands are released from the wheel rims. Gravity acts down on the patient as they move their arms backwards. Momentum decreases as the chair slows down.
Let me know if changes need to be made??xx
T7 new version
The table for the functional analysis of sit to stand will not copy onto this site correctly so I will print this section off for everyone at uni 2moro.xx
New version of T7
Case Study 7 Therapeutic skills
With your patient safely positioned on a plinth, demonstrate appropriate massage techniques to reduce oedema of the lower limb.
1. Explain the procedure to the patient
· Hello my name is...and I will be your physiotherapist today, you have been referred to physiotherapy for massage to your right leg, this will involve lots of light, gentle movements to stimulate you circulation. This should help to reduce the swelling and hopefully enable better movement. I’m going to have to go quite high up towards your groin and need to check this is ok with you?
· Are you happy with this to proceed? (consent)
2. Question patient about any contraindications
· Before I proceed, I need to check a few things with you
· Have you got high blood pressure? Do you suffer from osteoporosis? Have you got any fungi or bacterial diseases? Has this area been recently fractured? Are you allergic to anything? Is your circulation ok?
· Other contraindications (skin disorders, early bruising, open wounds, varicose veins, DVT, abnormal body temp etc can be visually seen so do not need to be asked about, bit inform the patient that you are looking for any visual contraindications)
3. Collect the relevant equipment
· Dry towels to keep patient modest and wipe area after finish
· Lubricants such as talc, massage oil etc
· Extra pillows to make patient comfortable
· Ask the patient to remove their tracksuit bottoms (if wearing them ) and the sock form their right foot
4. Position the patient
· Adjust the bed height so it is comfortable for you (the physio)
· Using pillows, support the patient comfortably
· Expose the right ankle, using towels to protect other leg and top of limb (patients will have to be wearing shorts)
· It is important when massaging such a large area that the Pt maintains their dignity and does not feel uncomfortable at any time
· Use towels to tuck the Pt’s shorts as far up as needed-gain consent before doing this!!
5. Inspect the right ankle
· Visual contraindications
· Do some sensory tests using pin prick and brush on hammer, with the patients eyes closed or looking away(show them what to expect by doing it on their hand first, with eyes open)
6. Application
· Position yourself so you are comfortable
· Correct the bed height so it is comfortable for you
· Ask patients if they are comfortable and happy for you to proceed
· Inform them you are going to begin the massage
· Apply you chosen lubricant
· Use long, slow strokes from proximal to distal to distribute the lubricant and adjust the patient to your touch
· Begin the massage
Massage techniques
Need to apply soft-tissue techniques; soft-tissue includes muscles, fascia, ligaments, tendons and skin.
You do not need to explain the specific strokes you are applying, simply inform the patient when you begin doing deeper strokes and the purpose of doing them. This will let the examiner know that you are performing petrissage techniques.
Pt should be lying flat in supine with affected leg supported higher in the air by pillows, after all strokes are completed in supine, Pt must be turned over (lying prone) in order to massage the back of the leg
NB: You must remain in contact with the Pt at all times
Stroking
· Performed with the whole hand, using a rhythmic and constant pressure for long strokes, done in direction of lymphatic and venous flow (proximal to distal)
· Superficial stroke
· Thousand hand is another form of stroking-again done proximal to distal using faster shorter alternate left and right hand strokes
Effleurage
· A deeper stroke
· Use hands to pass over area with pressure and speed
· It assists fluid to flow through tissue spaces , lymph vessels and veins
· Hands move distal to proximal of limb
· Hands move up the centre of the limb towards the groin with pressure
· Hands then move down the limb towards the foot with a hand on either side of the limb (like breast stroke) with less pressure
· Should be done in between the different petrissage strokes
Petrissage
The following strokes are examples of petrissage, other strokes are available. All strokes are done distal to proximal in order to bring any excess fluid towards the lymph nodes in your Popleteal fossa and groin. The lymphatic system moves lymph node fluid, waste substance, and nutrients out through your body bloodstream and tissues; therefore reducing the swelling at in the leg.
Kneading
· Hands are placed onto skin and allowed to mould to the shape of the limb
· Move alternately in a circular direction with pressure applied at the top of the circle, and released towards the bottom of the circle
· Therefore hands are applying alternate pressure and release which increases circulation of area and relaxes any muscle tension
Picking up
· Effects are similar to kneading
· Technique involves picking up (lifting) the tissues and applying a squeeze to the tissue before releasing them
· Like, kneading, it is done in a circular motion with slow, continuous and rhythmic motion
· Grasp of hand on tissue must be soft and supple
Wringing
· Same technique as picking up but a small twisting motion is applied to enhance the effect, this can be achieved by flexing and extending the wrists
· Technique mainly to be used on large loos muscle groups so probably not the ankle area
Skin Rolling
· Involves lifting and stretching the skin between the thumbs and fingers so that the skin and subcutaneous tissue are moved over each other
7. Complete the treatment
· Use towel to remove lubricant and dry the ankle area
· Remove towels from patient
· Assist patient to put on tracksuit bottoms
· Clean up the treatment area
8. Assist treatment efficacy
· Ask Pt how they are feeling
· Visually inspect the area for any adverse reactions
9. Treatment is finished!
Teach this patient to use walking sticks (partial weight bearing pattern)
Background-walking sticks can be used to redistribute the transmission of load and for balance.
1. Give the patient information about why they will be given sticks to walk
· “Right, now I’m going to show you the correct way to use walking sticks, these will give you a wider base of support when walking, which makes you more stable and balanced. They will also allow you to put some weight on your affected leg.”
2. Measure the sticks
· Ulnar styloid to the ground with elbow flexed at 15degrees
3. Inform the patient of any maintenance and safety issues
· “You must take extra care when using the sticks on wet ground. Always try to maintain a straight back and look ahead when using them (posture). If the ferrules (rubber bottoms on sticks) get worn away, bring them back to us so we can change them for you.”
4. Demonstrate to the patient the correct way to stand from sitting, and also the correct gait pattern.
· This must include how to turn
· Refer to your own posture and position of imaginary affected leg
· Mention any safety issues
· Gives you the opportunity to clear the area of any obstructions
Partial weight bearing gait pattern-3 and 1
Sit to stand
· From sitting on the edge of the bed, have affected leg outstretched in front
· Have both sticks in arm on side of affected leg (in right hand)
· Use other hand to push yourself up to standing
· Use same hand to reach over and grab one of the sticks
· Position in place to make a triangle
Feet
1 stick
1 stick
Turning
· 1 stick forwards, the other stick backwards, bad leg (put pressure on sticks to take pressure of leg), good leg
Walking
· Using the 3-1 gait pattern
· Standing on good (left) leg, move both sticks forward, then bad leg forward (bad leg in middle of sticks)
Left leg (good leg)
1 stick
1 stick
Right leg (Bad leg)
· Then swing through with left (good) leg to form another triangle, always maintaining that wide base of support ( the faster the gait, the more weight is put on the partial weight bearing limb)
To sit from standing
· Slowly walk backwards using the same technique until you can feel the chair on the backs of your legs
· Take both sticks in right hand
· Use left hand to lower yourself onto the bed
5. Get patient to go from sitting to standing using the sticks
· Due a final check that the sticks are the correct height
· Make sure the patient understands everything so far, and that they are comfortable and well balanced
· Position a chair at an appropriate distance away from the patient
6. Patient practises gait pattern
· Make sure patient is balanced in standing
· Have physio assistant on 1 side, and physio on the other side
· 1 step first
· Then a gait cycle
· Then progress forwards towards the chair
· Stay close to the patient at all times (anticipate the unexpected e.g. a fall)
· Get them to slowly turn
· Get patient to sit down on the chair
· Important to make the patient feel safe at all times, encourage them and let them know if there posture needs to be altered, or of any other mistakes
With an emphasis on pelvic activity (lumbar region of vertebral column and hip joint) analyse the activity of sit to stand
Ask the model to do the movement a few times at normal pace, and then a few times slowly. Then explain to the examiner the four phases which are;
1. Phase 1-Preparation phase-Model is sitting on the chair with legs at right angle to trunk
2. Phase 2-Execution phase (a)- Begins as model initiates flexion of the hips, bringing the trunk forward and finishes when trunk flexion has finished and knee extension is initiated
3. Phase 3-Execution phase (b) - Begins as model initiates knee extension, and hip extension, bringing trunk backwards. It finishes with the end of hip extension
4. Phase 4-End phase-Movement has finished and model is stood up straight
Tuesday, 9 December 2008
Right im doing T11, will you calm down Eoin lol. Have put all of it up but the bit with the getting off the floor into the wheelchair but will add that once we have done it in tomorrow's lesson.
Scenario 11
A 35 year old female with multiple sclerosis has weak lower limbs. She uses elbow crutches indoors and a wheelchair for outdoor mobility.
Teach this patient a simple active/active assisted exercise regime (using a mat on the floor) to help maintain range of movement, flexibility and strength in the lower limb. (Focus on the hips and knees).
1. Explain to your patient that you are about to do some simple leg exercises to help strengthen their knees and hips and increase the amount they are able to move. Get their consent!!
2. Explain that if they feel tired or in unbearable pain during the exercises they should let you know and you will either take a break, proceed to less strenuous exercises or stop doing exercise altogether. It is very important patients with MS do not overdo it as they could strain an already compromised muscular system. This leads to further pain and the body and mind being overtired and overworked. MS sufferers also a very sensitive to heat, so ask them to tell you if they feel too warm and it will make their symptoms worse.
3. Ask the patient to lie down on the mat and assist them if necessary. (You could ask your physio assistant to help with this).
4. With the patient laid flat on their back, ask them to bend and bring their right leg up towards their chest using both hands. To actively assist, support their knee joint and apply gentle pressure to the leg to assist in the hip flexion and increase the range of movement. Hold for 5 seconds and release back to full extension. Repeat 3-5 times and then do the same for the left leg.
(If your patient’s muscles go into spasm then they will not be able to begin with their legs flat and stretched out. They will lie with their knees bent and feet flat on the mat).
5. With the patient still laid on her back, ask her to bring her knees up so her feet are flat on the mat. Knees should be around 30 cm apart. Ask her to roll her knees over to the left, stretching diagonally across the trunk. Gently assist with this exercise, making sure you do not straight the patient. Bring the knees back to the middle, then roll the knees over to the right and back to the middle again. Make sure both shoulders stay in contact with the floor or bed. Repeat 3-5 times each side. Make sure the patients knees do not flop over and don’t rush. This helps strengthen the muscles used for internal and external rotation.
6. Return patient to lying position with knees bent and feet flat on floor. Ask her to lift her buttocks up of the floor as high as she can. You could possibly explain that she needs to tighten the muscles as if she was squeezing her buttocks together like they are squeezing a ball. As she raises her hips, support her with one hand above and one hand below and help her push upwards if needed. Guide her so that she moves straight up and down and does not waver from side to side. Repeat 3-5 times.
7. Return patient to lying position with knees bent and feet flat on floor. Ask her to tighten her tummy so that she tilts her pelvis to flatten her back down onto the mat. Ask her to hold for 5 seconds and then release. You may need to assist the first couple of “pelvic tilts” with your hands so that the patient gets an idea of how it feels. Repeat 3-5 times.
8. Although the question asks to mainly focus on the hips and knees, it might be an idea to do an exercise for the arms to show you have thought about this aspect too (only if you have time though). In the same lying position, ask her to lift her right arm upwards in a straight line (sagittal plane) so that it points to the ceiling. Slowly lower the arm and repeat 3-5 times and then do the same with the left arm. Support the arm at the elbow as you do this.
WEBSITES to look at:
http://www.mstrust.org.uk/downloads/exercises.pdf
http://www.webmd.com/multiple-sclerosis/guide/multiple-sclerosis-exercise
Assist the patient to get into the wheelchair from the floor and then teach a relative of the above patient how to ascend and descend a kerb with the wheelchair.
(Will fill this in once demonstrated in class how to get into the chair!!!!)
Analyse the activity involved in self propelling the wheelchair, with particular emphasis on the left shoulder (glenohumeral joint) and the left elbow.
Functional Analysis
Split into four phases
Start position
Preparation for push
Push
Recovery phase
Watch the model perform several cycles of the four stages in the wheelchair. Watch the motion from different angles and as the model to perform it in normal and slow motion.
1. Starting position:
MOTIONS: The left glenohumeral joint is in extension. The left elbow is flexed. Hands are on the wheels.
BASE of SUPPORT and COG: Flexion of cervical spine means that the centre of gravity is further forward than it would be if the client was sat up in the chair straight. Base of support is large as the chair has a large surface area on the ground.
FORCES: Gravity is acting down on the chair. There is friction between the client’s hand and the wheel rail.
2. Preparation for push
MOTIONS:
The glenohumeral joint flexes slightly from extension, but it still extended. Also there is slight abduction of the joint and lateral rotation. The shoulder girdle adducts and elevates. Elbow flexes further.
MUSCLES INVOLVED:
Glenohumeral joint: Supraspinatus, deltoid, latissimus dorsi, teres major, triceps, infraspinatus and teres minor.
Shoulder girdle: Rhomboids, trapezius and levator scapulae.
BASE of SUPPORT and COG:
BOS still large as all wheels are on the ground. Client BOS is smaller as their cervical spine is further flexed so they are sat further forward with a smaller surface area on the seat of the chair. COG is further forward.
FORCES:
Friction between the wheel and the ground. Gravity acting on the chair.
If client is sat further forward there will be more friction on the front wheels than the back as there is a larger downward force acting on the wheels at the front. There is friction between the hand and the wheel rim depending on how hard the client is applying a force.
3. Push
MOTIONS:
The glenohumeral joint flexes to neutral position and the elbow joint extends fully. The shoulder joint adducts and medially rotates. Shoulder girdle abducts and there is some depression and upward rotation. This propels the chair forwards by spinning the wheels. The trunk flexes further.
MUSCLES INVOLVED:
Glenohumeral joint: Pectoralis major, latissimus dorsi, teres major, subscapularis, anterior deltoid
Elbow joint: Coracobrachialis, triceps, biceps
Shoulder girdle: Trapezius and serrator anterior
BASE of SUPPORT and COG:
BOS is the same regarding the wheelchair on the floor, but is smaller between the body and chair due to the client being sat further forwards in the chair. COG is further forwards.
FORCES:
Friction between wheels and ground as the chair moves.
4. Recovery Phase
MOTIONS:
Glenohumeral joint abducts, laterally rotates and fully extends to return to original position. The elbow flexes again. The muscles contract eccentrically in the shoulder. The shoulder girdle adducts and elevates. Spine extends to normal sitting position.
BASE of SUPPORT and COG:
BOS increased between the body and chair as the buttocks have more contact with the chair. COG is more central as the body is sat more upright.
FORCES:
Friction slows the chair down as the hands are released from the wheel rims.
Hope all this is ok...add comments please if changes need to be made!
T2
STROKE PATIENTS, SCENARIO 2
Stage 1:
Before beginning the task should know- if the exercise is neccessary for the patient
How the patient is to be moved
What equipment is needed
Examine surrounding enviorment,checking for any obstacles that may provide problems during the exercise
Check that bed is at the correct height and the positioning of the wheelchair allows for easy transfer of patient to the bed
Patient initially sitting in wheelchair
Introduce yourself as the physio
Explain to the patient the objectives and benifits of the excercise.
Ask for consent before beginning the exercise
Test patient so that they are capable of the transfer
Right side is affected
Check patients dermatomes and then myotomes(comparing both sides to each other)
Now check arm and shoulder mvts
Ask them to their good/left arm up and down indepentely
Support affected arm up in flexion and see if patient can bring hand towards head (arm at 90 degrees)
Using left hand, have patient touch their nose and then back of neck in one motion
Then with right hand assist in touching their nose and then back of neck in one motion
Get patient to lift left thigh
Then while keeping heel of feet on the plate, get patient to lift their toes
Ask can they feel your hand on their left and right leg, does it feel the same on both sides
Assist patient in slighty lifting their right leg and get them to lower it slowly down
See if patient can extend knee while physio holds onto leg and foot
Get patient to bring legs in closer together and back out
See if they can slowly lower downwards knee
Can the patient bring there shoulder and back of the chair (hands on knees)
Physio in front and assistant behind
Physio places hand down along side and holds onto hip
See if patient can shuffle on left and then right keeping their spine in slight forward flexion
Stage 2:
Bring wheelchair up to side of bed at an angle
Paper towel should be placed on bed for infection control
Physio should make sure that patient should turn no more than 90 degrees on the rotator
Take the foot plates off completely and hold onto patients foot as you do so
Rotar turner shoul be pushed in right to wheel chair
Get patient to lean forward once more and to reach rotar turner with good arm
Then stop and explain the movement needed to stand up
Tell patient to look straight ahead while in the process of sit to stand
Patient holds onto turner with good arm and physio holds onto hips, offering stability to trunk, and helps patient stand up against rotar
Physio assistant stands on other side of rotar making certain it is stable
Spin rotar around so that patients bum is facing the bed
Physio continueosly holds onto patient at weak side
Explain that you will be sitting back onto the bed and you will be sitting back with them
Allow patient to feel for position of bed before sitting, physio offering guidance and reassurance
Slowly sit back with patient,arms still in support of back
Physio and assistant helps patient to shuffle back
Assistant lowers the bed while physio is still sitting with patient
Physio assistant moves to behind patient, kneeling on bed and supporting trunk and shoulders
Physio places approx 3 pillows on affected side of patient, gives slight support
Physion kneels on floor in front of patient ready to remove shoe
Stage 3:
Take the affected/right arm and put it under the medial aspect of the patients left knee and the other hand under the later aspect of the knee.
Physio places hands around ankle for support and the patient lifts that leg ( left) up and across over the right leg
After each leg cross tell patient to bring good hand down to shoe and slide it off and then back up to knee and into normal sitting position
Physio holds onto weak arm while patient removes shoe
Then do the same with the opposite leg
Tell them to practice with relatives and to wear appropriate shoes for easy shoe removal
Analyse the activity occuring at the lumbar spineand the hip joint as the patient removes the shoe from the unaffected leg.
Starting Position – hip flexed to 90, slight abduction, lumbar spine-lumbar lordosis.
Muscle work isometric to maintain an upright sitting position.
BOS quite large as it includes the chair and the floor spaces in-between.
COG at pelvic level,just anterior to ischial tuberosities when sitting.
Movement in saggital plane
Hip joint
As the model flexes forward, the hip moves into further flexion, as the leg is raised from the floor. Flexion is occuring in the sagittal plane around the coronal axis,muscles achieving hip flexion are rectus femoris and ilioposoas working concentrically.
As the model facilitates raising the leg off the ground their is further flexion using the same muscles.
The hip is raised higher than neccessary so that the opposite leg can be cleared,therefore the hip must extend by eccentric contraction of the above muscles (rectus femoris and ilioposoas) to the lower leg, so it comes to rest across the opposite leg.
There is the some further flexion as the model flexes forward to reach the shoe, again this is in the sagittal plane, the muscles initiating the movement are rectus femoris and the ilioposoas, working concentrically. However to overcome gravity pulling you further forward the hip extensors: gluteus maximus and the 3 hamstring muscles will work eccentrically to stop the movement.
Following the removal of the shoe, the hip flexors contract concentrically to raise the leg off the opposite one so that the leg is cleared when placing it back on the floor.
As the leg is lowered to the ground it extends by eccentric contraction of the hip flexors rectus femoris and iliopsoas, they lower the leg gently down to a 90degree of hip flexion, as start position.
Lumbar spine
From the original neutral start position, the lumbar spine goes into flexion, and this occurs in the sagittal plane around a coronal axis, it is initiated by a concentric contraction of rectus abdominus and psoas major. At a certain point gravity wil take over,therefore eccentric work of the spinal extensors bilateral erectae spinae and mutifidus must occur to slow/stop the movement.
The model then extends the lumbar spine back to the upright position, occuring in the sagittal plane by concentric contraction of bilateral erectae spinae and multifidus.
Then do the same with the opposite leg
Monday, 8 December 2008
Sunday, 7 December 2008
M14 - again...sorry its late guys
Musculoskeletal case study 14
Karen Patton is a 21 year old club footballer who has recently pulled a muscle at the front of her right thigh. The injury occurred whilst kicking a ball 5 days ago. She attended the local walk-in centre where a diagnosis of grade 2 rectus femoris strain was made and she was referred to physiotherapy. Karen walks on elbow crutches and is partial weight bearing through her right leg. She is off work from her job as postal worker. Apart from a previous similar injury 8 months ago she is otherwise fit and well.
Notes on this case:
Pathology: Muscle strains-
A muscle strain is damage caused by over-stretching of muscle tissue. In football, this is thought to occur most frequently when movements such as sprinting, stretching for the ball or kicking the ball are carried out in an uncoordinated manner. The muscle tissue becomes overloaded and reaches a breaking point where a tear or partial tear occurs. The player will experience pain that will persist if he or she attempts to stretch or contract the muscle. Depending on their severity, muscle strains are categorised into Grades 1, 2 or 3:
Grade 1 strainThere is damage to individual muscle fibres (less than 5% of fibres). This is a mild strain which requires 2 to 3 weeks rest.
Grade 2 strainThere is more extensive damage, with more muscle fibres involved, but the muscle is not completely ruptured. The rest period required is usually between 3 and 6 weeks.
Grade 3 strainThis is a complete rupture of a muscle. In a sports person this will usually require surgery to repair the muscle. The rehabilitation time is around 3 months.
All muscle strains should be rested and allowed to heal. If the patient continues to play, the condition will worsen. If ignored, a grade one strain has the potential to become a grade two strain or even a complete rupture.
Anatomy-
Rectus femoris muscle
Function > hip flexion and knee extension
Location > origin at the anterior inferior illiac spine and the illum above the acetabulum.insertion at the quadriceps tendon to the base of the patella and onto tibial tuberosity via the patellar ligament.
Subjective
History – occurred whilst kicking a ball 5days ago (the mechanism of injury and the aetiology/cause of the pathology)
Otherwise fit and healthy
no mention of any medication or any social history
Symptom profile - pain in rectus femoris muscle, the level of pain would be determined by the patient and they should be asked to rate the pain on a scale of 1-10
Pain behaviour – you would expect there to be pain upon stretching and contracting
patient is walking on crutches and partial weight bearing so pain might be considerable and the patient should not be asked to fully weight bear on this leg during the objective examination
also patient is current off her job as a postal worker, which would indicate a certain level of disability
Variable factors (aggravating/easing factors)
- the pain should be eased when the PRICE principles are applied I.e. protection of the area, rest, ice, compression and elevation. The pain would be made worse on increased action of the muscle
Functional loss – the patient will have pain going up and down stairs, walking and standing up/sitting down, due to the stretch and contraction that this puts onto the rectus femoris
Special questions – these would be to exclude OA and RA, referred pain from the lower back and a fracture
Ask the patients opinion and also see what you can observe without asking, I.e. patient walking, the patient's standing still posture and sitting down
Expected observations, signs and symptoms would be abnormal gait due to partial weight bearing on the affected side, pain upon weight bearing and stretching the muscle into flexion at the knee or on extension of the hip also upon contraction of the muscle by extending the knee or flexing the hip
Main problems of patient?
What is their opinion?
possibly the fact that she is off work, or that she cannot play football
The areas affected is the anterior thigh and the structures involved would be the quadriceps muscles along with the knee and hip as these are the two joints that the rectus femoris works across
Objective
Gain consent!
Likely observations
other than posture and gait changes there are not normally any visual observations with a muscle strain I.e. no swelling, deformity or skin colour change
Assessment of movement, looking at the responses to function
I.e. ask the patient to actively move the muscle and then passively move the patients limb through the end range of movement (think about the patient's positioning)
do movements that would be less painful first:
adduction
abduction
medial rotation
lateral rotation
then movements that you would expect to be painful:
extension of knee
flexion of knee
flexion of hip
extension of hip (patient on side or supine)
Assessment of contractile tissues
I.e. Resisted tests
do movements that would be less painful first:
adduction
abduction
medial rotation
lateral rotation
the following movements may be too painful to do a resisted test with the patient and possibly unwise due to the muscle strain and making the pain worse and lowering function:
extension of knee
flexion of knee
flexion of hip
extension of hip
Assessment of function
I.e. ADL's and Gait
These can be observed as the patient enters the room and sits down/ stands up and walks across the waiting room and testing them will probably cause unnecessary pain as it is already known that the patient is partial weight bearing and using crutches
Special tests
Thomas's (rectus femoris contracture test) - this would be painful and positive
Trendelenberg – this test would require weight bearing and would be unnecessary so should not be attempted
Fabers test – this requires knee flexion and hip abduction/ external rotation and so would be painful and positive due to knee flexion
Ober's sign – abduction and extension of the hip with flexion of the knee, this test would have to be administered with extreme care as both the extension of the hip and flexion of the knee would be painful for the patient
Palpation for tenderness should be done
You would need to warn the patient of increased pain/symptoms for the next 24-48hrs following the examination
Goniometric measurement of movements could be taken
I.e. measurements of extension of knee
flexion of knee
flexion of hip
extension of hip
these could then be used throughout treatment to check for improvement of the patients ability to stretch/contract the affected muscle
This patient has experienced a previous muscle strain so advice should be given to prevent further strains, including:
Warm up prior to matches and training.
Performing a cool down after matches and training, including stretching.
Maintaining good muscle strength and flexibility.
Having a diet high in carbohydrate in the 48 hours before a match, so there will be an adequate supply of the energy which is necessary for muscle contractions.
T9 - sorry it's late
Therapeutic skills case study 9
This is a draft as Jill said we will be going through this scenario in a seminar soon so I will add to this then.
You are a physiotherapist working on a vascular surgical ward. A 65 year old gentleman has recently had a left below the knee amputation as a result of peripheral vascular disease and diabetes mellitus.
Demonstrate a post operative physiotherapy management plan to prevent post operative secondary complications and promote functional recovery of this patient (prior to out of bed mobilization).
Teach this patient to transfer from bed to wheelchair
With an emphasis on the shoulder (glenohumeral joint) and the elbow of the leading arm, analyse the above transfer.
Notes on this case:
Peripheral vascular disease:
Peripheral vascular disease (PVD), also known as peripheral artery disease (PAD) or peripheral artery occlusive disease (PAOD), is a collator for all diseases caused by the obstruction of large peripheral arteries, which can result from atherosclerosis, inflammatory processes leading to stenosis, an embolism or thrombus formation. It causes either acute or chronic ischemia (lack of blood supply), typically of the legs. One of the causes is diabetes mellitus.
Diabetes mellitus
Diabetes mellitus, often referred to as diabetes, is a syndrome resulting in abnormally high blood sugar levels (hyperglycaemia).Blood glucose levels are controlled by chemicals and hormones in the body, including the hormone insulin. Diabetes mellitus refers to the group of diseases that lead to high blood glucose levels due to defects in either insulin secretion or insulin action. All forms of diabetes are treatable with insulin but there is no cure. Injections deliver insulin, which is a basic treatment of type 1 diabetes. Type 2 is managed with a combination of dietary treatment, medications and insulin supplementation.
Below the knee amputations
This is called a transtibial amputation and is one of the most common types of amputation. Surgeons try to preserve the knee joint whenever it is practical to do so and will fashion the stump at the lowest practical level. Very short stumps make fitting a prosthesis extremely difficult and very long below-knee stumps are prone to circulation problems.
Things to consider:
A rigid dressing will be in place on the stump for 10-14days after surgery.
Exercises are important to prevent contractures.
Also certain posititions should be avoided to prevent contractures,
Such as- hanging the stump over the side of the bed, sitting in a wheelchair with the stump flexed, placing pillows under the hip or knee, placing a pillow under the back and curving the spine, lying with knees flexed, placing a pillow between thighs and crossing legs over.
Introduce yourself to the patient
Wash hands if you are going to touch the patient
Explain to the patient that exercises need to be done in order to increase circulation and prevent muscle shortening (contractures).
Gain the consent on the patient to go ahead
Section one
Post operative exercises:
The unaffected leg-
Exercises need to be done on the unaffected leg as the patient has not been able to get out of bed so needs to maintain strength and circulation in this leg.
Exercises would include:
Plantar and dorsiflexion of ankles (10 times)
Flexing knees and hips towards the trunk (10 times)
Tense hamstrings and push knee down against the bed (10 times)
Straight leg raises (5-10 times)
Tense glutes to relieve pressure exerted on buttocks (10 times)
The affected leg-
(I asked Jill what the patient would be able to do with the amputated leg and she said we would go through it in class)
My research has found that since the amputation is below the knee that the usual quad and hamstring exercises would apply
I.e straight leg raises,
tensing hamstrings,
lying on front and stretching the quads by raising the stump,
adduction and abduction stretches of the affected leg,
attempting to bend the knee
(However, I will revise this list once we have gone through it in class.)
Section two
Teaching the patient to transfer from bed to wheelchair
(Again I am unsure if these transfers are correct so I will alter them accordingly)
Transfer 1
Using a leg pivot transfer
A single-leg pivot shift transfer involves having the new amputee stand on the sound limb and turn their body in order to comfortably sit onto the wheelchair. Often, especially if the individual is weak or unsteady, this type of transfer needs to be done with the assistance of a therapist or nurse.
Transfer 2
Using a sliding board to transfer
As shown in the diagram
Ask the patient to slide/shuffle to the edge of the bed
Put the sliding board in place, ensuring the bed is at the same level as the wheelchair, and teach the patient to take their weight on the unaffected leg and the arm that is on the bed and then slide over on the board into the wheelchair reaching for the wheelchair arm for support. Then lower themselves down into the wheelchair.
Section three
Functional analysis
The shoulder and elbow of the leading arm during the transfer from bed to wheelchair
As I am unsure which transfer Jill and Anne will be teaching us I do not know what action the arm will be doing so cannot do the functional analysis until we have gone through this in class.
Structure for the functional analysis:
describe the starting position
break the movement down into phases
discuss muscle activity, planes, mechancial principles and forces
describe the finishing position
Friday, 5 December 2008
NEW M8 - Thankyou for the help :)
Musculoskeletal Case study 8 (M8)
Subjective Assessment
PC - James Anderson is a 20 year old apprentice plumber who has been experiencing pain in his right hand for 2 months since he sustained a fracture to the 5th Metatarsal shaft following a punch injury. This was fixed internally with a plate and screws. He is now noticing wasting of the muscles around the thenar and hypothenar eminence and has decreased grip strength and limited MCP and IP movement of the 3rd and 4th digits. He is currently off work but needs to grip for prolonged periods but the pain and lack of grip makes it difficult to return to work.
HPC - Sustained a fracture to the 5th Metatarsal shaft following a punch injury. This was fixed internally with a plate and screws.
PMH - NIL
DH - NIL
SH - He lives with his parents and teenage brother in a 3-bed house.
Other;
- R/L handed?- General health ok?- PMH- osteoporosis, bone disease, diabetes, HBP, respiratory disease, steroid use, major operations, previous fractures?
- RA/FHRA
- Drugs being taken?
- Claiming for compensation for accident?
- Hobbies
- Anyone else who may be able to help round the house, what sort of tasks is she struggling with?
Identification of Pathology
Boxer’s Fracture
It is usually caused by punching something harder than the hand, such as a wall or another person's head. The end of the metacarpal bone takes the brunt of the impact, which usually breaks through the narrowest area near the end (the "neck"), and bends down toward the palm.
Typical signs and symptoms –
The typical symptoms of a boxer's fracture are pain or tenderness centred in a specific location on the hand corresponding to one of the metacarpal bones, around the knuckle. You may also note pain with movement of your hand or fingers. When a bone is broken, you may experience a snapping or popping sensation in the affected bone. Your hand may swell, discolour, or bruise around the injury site. Deformity of the broken bone or the knuckle may also be noted. There may also be abnormal movement of the broken bone fragments. The doctor may be able to produce pain by pressing on the broken bone. In addition, pain can be produced by grabbing the finger that attaches to the metacarpal bone that was hurt and pushing it inward toward the broken bone. If you make a fist with the affected hand, the doctor may notice misalignment of the associated finger. The doctor may see a deformity of the broken bone. When making a fist, the finger involved may bend toward the thumb more than is usual. This is known as rotation, and, though not always seen, its presence may indicate the possibility of a more serious type of boxer's fracture. Another common sign of a possible boxer's fracture is a cut on the hand. A cut in the skin associated with a boxer's fracture may indicate a more serious type of boxer's fracture.
Area of concern (relationship; muscles, bone, tendons, nerves)
Thenar eminence - Fleshy (muscular) area formed by intrinsic (thenar) muscles of thumb.
Hypothenar eminence - Fleshy (muscular) area formed by intrinsic (hypothenar) muscles of 5th digit.
Proximal crease - The proximal portion of the wrist joint indicates the site of articulation between the distal radius and the proximal row of carpal bones
Distal crease - Distal surface marking of the wrist joint indicates the articulation between the distal row of carpal bones with the base of the metacarpal bones.
Proximal digital crease - Proximal knuckle of thumb and site of the metacarpophalangeal joints (MCP) of fingers.
Proximal interphalangeal crease - Middle knuckle of fingers is the site of the proximal interphalangeal joints (PIP) of fingers.
Distal interphalangeal crease - Distal knuckle of fingers is the site of distal interphalangeal joints (DIP) of fingers.
Hand
There are 5 Metacarpals;
- Proximal articulation - distal row of carpal bones of wrist
- Distal articulation - proximal phalanx of fingers
Digits
There are 5 Fingers, and 3 joints;
- 3 Phalanges ( proximal, middle, distal)
Thumb
- 2 phalanges ( proximal, distal)
MCP Joint;
Condyloid joints,
Flexion / Extension
Abduction / Adduction
Head of metacarpals and base of proximal phalanx
PIP Joint
Hinge joint
Proximal and middle phalanges
Flexion / Extension
DIP Joint
Hinge joint
Middle and distal phalanges
Flexion / Extension
PIP Joint of Thumb
Hinge joint
Proximal and distal phalanges
Flexion / Extension
Flexor Muscles
Flexor digitorum superficialis
- Flexes the proximal interphalangeal joint of the fingers (digits 2 -5)
- Stimulated by the median nerve
Flexor digitorum profundus
- Flexes the distal interphalangeal joints of the fingers
- Muscles to fingers 1 & 2 -innervated by deep branch of median nerve
- Muscles to fingers 1 & 2 -innervated by ulnar nerve
Flexor Pollicis Longus
- Flexes interphalangeal joint of thumb
- Stimulated by deep branch of median nerve.
Extensor Muscles
Extensor digitorum
- Extends metacarpophalangeal joints of fingers.
Extensor indicis
- Helps extends metacarpophalangeal joints of 1st finger.
Extensor Digiti V
- Helps extends metacarpophalangeal joints of 4th finger.
Extensor pollicis longus and brevis
- Extends the M.P. & I.P. joints of the thumb respectively.
Abductor pollicis longus
- Abducts the 1st. carpometacarpal joint.
Hypothenar
- Located on ulnar side of hand
- Act on M.C.P. joint of 4th finger.
Interossei
- Palmar (3 in number)
§ Arise from palmar surface of metacarpal bones 2,4,5
§ Adduct the MP joint of fingers 2,4,5
- Dorsal (4 in number)
§ Arise from dorsal aspect adjacent metacarpal bones
§ Abduct digits 2, 3, 4
- Interossei innervated by ulnar nerve
- Act as flexors of MP joint
Extension of the Fingers
- M.C.P. joints strongly extended
- Extensor digitorum
- Extensor indices
- Extensor digiti minimi
P.I.P. joints extended together as a unit
- Extensor digitorum
- Weak extenders of PIP joints
Flexion of the Fingers
M.C.P. Joints
- Interossei
- Prime movers of MP joint flexion
Proximal Interphalangeal Joints ( P.I.P.)
- Flexor digitorum superficialis
Distal Interphalangeal Joints (D.I.P)
- Flexor digitorum profundus
· Adduction of the Fingers
- Motion occurs at M.C.P. joints
- Palmer Interossei (3)
- 2nd finger is center of hand
- Fingers 1, 3 & 4 move toward 2nd. finger
Abduction of the Fingers
- Motion occurs at M.C.P. joints
- Dorsal Interossei (4)
- 2nd finger is center of hand
- Any movement of 2nd finger is considered abduction
- Fingers 1, 3 & 4 move away from 2nd finger.
Movements of Thumb
- Flexion - thumb moves across the palm
- Extension - thumb moves away from the palm
- Abduction - thumb moves away from hand towards you
- Adduction - movement of thumb towards hand
- Opposition - flexion and rotation of thumb to touch pads of other fingers
Where is the pain (patients complaints)
Pain around the third and fourth digits; also decreased grip strength.
Easing and aggravating factors
Aggravating;
- Trying to grip or pick up objects
- Extension, flexion, abduction and adduction of the lateral 3 digits.
What happens as a result of Boxer’s Fracture;
However, if the bone heals with too much of a bend, it may mess up the action of the tendons which straighten the other finger joints, and result in a permanent bend in the middle knuckle of the finger.
Objective assessment
Sensory tests
- Test each finger separately; especially the fingers that share the same nerve as the affected finger; third and fourth digit share the same nerve; ulnar nerve as the affected fifth digit. Then comparing this to the unaffected hand.
- If patient has pins and needle or numbness in these fingers it is likely there is a nerve lesion; possibly caused by the surgery or local anaesthetic.
Movements;
- Ask patient to make a fist; if there is limited movement as the M.C.P joints of the affected finger and possibly the third and fourth digit, this usually indicates a Boxer’s Fracture. Limited movement all together in these joints is also a common symptom.
- Also ask the patient to pick u p various sized objects; usually, the smaller the object the harder it is for the patient to pick it up, if a Boxer’s fracture is present.
Measurements
- Goniometer measurements;
- Average joint flexion of fingers;
- MCP Joint - 0-90º
- PIP Joint – 0-100º
- DIP Joint – 0-80º
- Average ROM of Thumb
- PIP Joint flexion – 0-80º
- PIP joint extension – 0-20º
- MCP Joint flexion – 0-55º
- MCP extension (passive) – 0-5º
- Carpo-metacarpal abduction – 0-20º
- Carpo-metacarpal adduction – 0-15º
Other affected muscles/areas due to pathology
Possible wrist affected;
Flexion- 0-70º
Extension – 0-70º
Radial deviation – 0-20º
Ulnar deviation – 0-35º
Pronation – 0-75º
Supination – 0-80º
Speak to patient when performing tests and measurements.
Wednesday, 3 December 2008
M8 ... so far ... neeed help please :(
ANYY HELPPP PLEEASE .. THIS IS WHAT IV GOT SO FAR ....
Subjective Assessment
PC - James Anderson is a 20 year old apprentice plumber who has been experiencing pain in his right hand for 2 months since he sustained a fracture to the 5th Metatarsal shaft following a punch injury. This was fixed internally with a plate and screws. He is now noticing wasting of the muscles around the thenar and hypothenar eminence and has decreased grip strength and limited MCP and IP movement of the 3rd and 4th digits. He is currently off work but needs to grip for prolonged periods but the pain and lack of grip makes it difficult to return to work.
HPC - Sustained a fracture to the 5th Metatarsal shaft following a punch injury. This was fixed internally with a plate and screws.
PMH - NIL
DH - NIL
SH - He lives with his parents and teenage brother in a 3-bed house.
Identification of Pathology
Possible ulnar nerve lesion.
Ulnar nerve-can be entrapped while passing into the forearm by passing through the origin of the flexor digitorum superficialis muscle. The usual result is loss of function of most intrinsic muscles of the hand and loss of sensation along the ulnar side of the palm and 5th finger. The ulnar nerve also runs over the top of the hand covering the 5th finger, 75% of the ring finger and around 25% of the middle finger; 3rd, 4th and 5th digits.
Typical signs and symptoms -
- There is a clawing of the 4th and 5th digits due to paralysis of all of the interossei.
- The patient can not grasp object between fingers because abduction and adduction of the fingers is impossible
- Thumb is in an extended and abducted position as a result of paralysis of the adductor pollicis
- Weak flexion and ulnar deviation of wrist
- Difficulty making a fist and grasping objectsLesions of the ulnar nerve at the wrist (distal lesions) or entrapment of the deep branch of the ulnar nerve as it passes into the palm are similar to the more proximal lesions except there are not loss of wrist function and the "clawing " may not be as pronounced because the extrinsic finger flexors are not affected. There is little if any sensory loss.
Area of concern (relationship; muscles, bone, tendons, nerves)
Thenar eminence - Fleshy (muscular) area formed by intrinsic (thenar) muscles of thumb.
Hypothenar eminence - Fleshy (muscular) area formed by intrinsic (hypothenar) muscles of 5th digit.
Proximal crease - The proximal portion of the wrist joint indicates the site of articulation between the distal radius and the proximal row of carpal bones
Distal crease - Distal surface marking of the wrist joint indicates the articulation between the distal row of carpal bones with the base of the metacarpal bones.
Proximal digital crease - Proximal knuckle of thumb and site of the metacarpophalangeal joints (MCP) of fingers.
Proximal interphalangeal crease - Middle knuckle of fingers is the site of the proximal interphalangeal joints (PIP) of fingers.
Distal interphalangeal crease - Distal knuckle of fingers is the site of distal interphalangeal joints (DIP) of fingers.
Hand
There are 5 Metacarpals;
- Proximal articulation - distal row of carpal bones of wrist
- Distal articulation - proximal phalanx of fingers
Digits
There are 5 Fingers, and 3 joints;
- 3 Phalanges ( proximal, middle, distal)
Thumb
- 2 phalanges ( proximal, distal)
MCP Joint;
Condyloid joints,
Flexion / Extension
Abduction / Adduction
Head of metacarpals and base of proximal phalanx
PIP Joint
Hinge joint
Proximal and middle phalanges
Flexion / Extension
DIP Joint
Hinge joint
Middle and distal phalanges
Flexion / Extension
PIP Joint of Thumb
Hinge joint
Proximal and distal phalanges
Flexion / Extension
Flexor Muscles
Flexor digitorum superficialis
- Flexes the proximal interphalangeal joint of the fingers (digits 2 -5)
- Stimulated by the median nerve
Flexor digitorum profundus
- Flexes the distal interphalangeal joints of the fingers
- Muscles to fingers 1 & 2 -innervated by deep branch of median nerve
- Muscles to fingers 1 & 2 -innervated by ulnar nerve
Flexor Pollicis Longus
- Flexes interphalangeal joint of thumb
- Stimulated by deep branch of median nerve.
Extensor Muscles
Extensor digitorum
- Extends metacarpophalangeal joints of fingers.
Extensor indicis
- Helps extends metacarpophalangeal joints of 1st finger.
Extensor Digiti V
- Helps extends metacarpophalangeal joints of 4th finger.
Extensor pollicis longus and brevis
- Extends the M.P. & I.P. joints of the thumb respectively.
Abductor pollicis longus
- Abducts the 1st. carpometacarpal joint.
Hypothenar
- Located on ulnar side of hand
- Act on M.C.P. joint of 4th finger.
Interossei
- Palmar (3 in number)
§ Arise from palmar surface of metacarpal bones 2,4,5
§ Adduct the MP joint of fingers 2,4,5
- Dorsal (4 in number)
§ Arise from dorsal aspect adjacent metacarpal bones
§ Abduct digits 2, 3, 4
- Interossei innervated by ulnar nerve
- Act as flexors of MP joint
Extension of the Fingers
- M.C.P. joints strongly extended
- Extensor digitorum
- Extensor indices
- Extensor digiti minimi
P.I.P. joints extended together as a unit
- Extensor digitorum
- Weak extenders of PIP joints
Flexion of the Fingers
M.C.P. Joints
- Interossei
- Prime movers of MP joint flexion
Proximal Interphalangeal Joints ( P.I.P.)
- Flexor digitorum superficialis
Distal Interphalangeal Joints (D.I.P)
- Flexor digitorum profundus
· Adduction of the Fingers
- Motion occurs at M.C.P. joints
- Palmer Interossei (3)
- 2nd finger is center of hand
- Fingers 1, 3 & 4 move toward 2nd. finger
Abduction of the Fingers
- Motion occurs at M.C.P. joints
- Dorsal Interossei (4)
- 2nd finger is center of hand
- Any movement of 2nd finger is considered abduction
- Fingers 1, 3 & 4 move away from 2nd finger.
Movements of Thumb
- Flexion - thumb moves across the palm
- Extension - thumb moves away from the palm
- Abduction - thumb moves away from hand towards you
- Adduction - movement of thumb towards hand
- Opposition - flexion and rotation of thumb to touch pads of other fingers
Where is the pain (patients complaints)
Pain around the third and fourth digits; also decreased grip strength.
Easing and aggravating factors
Aggravating;
- Trying to grip or pick up objects
- Extension, flexion, abduction and adduction of the lateral 3 digits.
What happens as a result of ….
Subjective assessment
What story would you expect?
What common things would you expect?
What muscle/joint does; how it affects movement (area anatomy)
Objective assessment
Measurements
- Goniometer measurements;
- Average joint flexion of fingers;
- MCP Joint - 0-90º
- PIP Joint – 0-100º
- DIP Joint – 0-80º
- Average ROM of Thumb
- PIP Joint flexion – 0-80º
- PIP joint extension – 0-20º
- MCP Joint flexion – 0-55º
- MCP extension (passive) – 0-5º
- Carpo-metacarpal abduction – 0-20º
- Carpo-metacarpal adduction – 0-15º
Specific tests
Other affected muscles/areas due to pathology
Possible wrist affected;
Flexion- 0-70º
Extension – 0-70º
Radial deviation – 0-20º
Ulnar deviation – 0-35º
Pronation – 0-75º
Supination – 0-80º
M8
SOOOOOO much trouble with M8 :( ... iv started but it seems like im headin in the wrong direction with it ... anny ideas :S ...
Steph
X
M8
SOOOOOO much trouble with M8 :( ... iv started but it seems like im headin in the wrong direction with it ... anny ideas :S ...
Steph
X
Steph
X
M8
SOOOOOO much toruble with M8 .. :( ... any help .. started but seems really long and im confuseddd !?
Steph
X
Dates to meet in clinical skills
First meeting Thurs 4th 3-5 pm - we will cover T1,T2,T3
Sat 6th 10:30 - 12:30 - T4,T5,T6
Teus 9th 10-12 - T7,T8,T9
Thursday 11th 3-5 T10,T11,T12
Sat 13th 10:30-12:30 T13,T14 & Identify problem areas for last 2 sessions - arrange group dates for after christmas
Teus 16th 10-12
Thurs 18th 3-5
If your question is listed can you be prepared to demonstrate and explain your exam question - and take notes from the short 10 minute discussion that should follow your demo. Most importantly if it is your question can you make sure you turn up!
Can you also make sure you edit your blog post to reflect any ideas which are raised by the group. Please see this blog as "work in progress". We are all responsible for keeping our answers up to date - hopefully when we leave for christmas the therapeutic work should be finished - we can print off the answers - and any further questions or reflections can just be added as a comments to the post.
Tuesday, 2 December 2008
Musculo scenario 5 - wrist- Sheila Bramley
Pt is a retired seamstress, 61, sustained a Colles frac of the R wrist 8 weeks ago when she tripped and fell. Out of plaster for the last 2 weeks. X-ray now shows sound bony union.
Anatomy of area
Wrist is formed by the inferior surface of the lower end of the radius and an articular disc superiorly, and the proximal surface of the scaphoid, lunate and triquetral inferiorly, which together with the ulnar and radius styloid processes form a synovial ellipsoid joint.
Symptom profile/aetiology
- A CF is a frac to the distal end of radius, where the distal fragment is displaced posteriorly.
- Within 2.5cm of the wrist joint
- Occurs predominantkly in older people, following a fall onto outstretched hand.
- Common belief that CF is assoc'd with osteoporosis, as is common in post-menopausal women
- Union - normally takes place within 4-6 wks, ie initial bone repair. Bone will still give a little under pressure and still be painful. Full weight bearing through hand still not possible, some external support may still be needed.
- Consolidation- 8-12 wks- full bone repair. No movement at frac site. No frac lines visible on X-ray, and full function can commence with damaging fracture.
-expected outcome- 6 mths from frac, pt should have fully functional wrist, but may lack full movements, esp extension and supination. Should however regain full functional use.
Possible problems with a CF
- median nerve compression
- CTS
- rupture of extensor pollicis longus
- Sudeck's atrophy (severe pain and swelling, x-ray will show patchy osteoporosis)
- mal-union
- joint stiffness
- alteration to healing rate
Problems of patient
a) Physical - dull ache around wrist
- shooting pain in R forearm on wrist flexion
b) functional- unable to use R arm for > 5 mins
- can't lift heavy items
- no-one to do housework as hus has mobility problems due to hip OA and unable to help
Subjective
In addition to facts we are given, I would want to establish the following:
- R/L handed?
- general health ok?
- PMH- osteoporosis, bone disease, diabetes, HBP, respiratory disease, steroid use, major operations, previous fractures?
- recent weight loss?
- RA/FHRA
- FH of Dupuytrens disease?
- drugs being taken?
- claiming for compensation for accident?
-hobbies
- anyone else who may be able to help round the house, what sort of tasks is she struggling with?
Objective examination
Observations- appearance of wrist- pt still wearing a tubigrip for support- normal at this stage- she feels she still needs some external support.
- will be thickening of radius due to callus formation at frac site, on palpation. This will be emphasised due to muscle wasting in the forearm
- bone may still give a little under pressure at frac site, which will give pain.
- reduced muscle bulk- measure and compare girth of R and L forearms, and the same point, recording the precise point of measurement.
ROM tests
Would expect reduced range of movements and stiffness in the R wrist after only 2 wks out of plaster
- wrist- test flexion, extension, radial and ulnar deviation, active, passive and resisted. Would expect considerable weakness. Would take care to to place joint under too much pressure on flexion as pt reports sharp pain on this movement
- radioulnar joint- test pronation and supination. Weakness would be expected
- elbow- flex/ext. Would also expect weakness here as the R arm will have be used very little over the last 8 weeks, and elbow flexors and extensors will have weakened
- fingers- flex/ext- likely to be some weakness here also
-shoulder- would want to test as pt may have held injured arm close to body while injured, in an unnatural position- test flex/ext, ab- and adduction, int & ext rotation, may be some loss of power here
- grip strength- measure R and L to compare- handedness of pt needs to be borne in mind. strength of grip is likely to be reduced
- dexterity tests- grip tennis ball, pick up a 1cm peg, hold a key, touch thumb to little finger ( median nerve test)
Other issues
- discuss with patient occupational issues- may need assistance in the house for the next few weeks until she regains strength in the injured arm, discuss possible referral to OT or social services
- warning- joint will feel more painful for next couple of day following this examination- this is nothing to worry about and will subside, painkillers and ice treatment will help.
- pt seems to be a little behind where she might expect to be at this stage of recovery from a CF, but this is likely to be due to her age.
Gareth
Monday, 1 December 2008
m1
Case History 1 – Knee
Robert Long is a 32 year old solicitor who plays football twice per week in his spare time. 10 days ago, while playing football, he was tackled and fell. He continued for 5 minutes, but was unable to continue due to pain and giving way in the left knee when he twisted. He now complains of pain over the medial aspect. He has a lot of swelling over the knee and walks with a limp. His likely diagnosis is that he has sustained a partial tear of the medial meniscus and collateral ligament but the anterior cruciate ligament is OK. He lives with his wife and 2 sons in a 3-bed house and is not currently taking any medication other than anti-inflammatories.
PMC (Present Medical Condition);
• Robert long was playing football when he was tackled and fell over. He continued to play for 5 mins but was unable to continue due to pain and giving way of the left knee when he twisted.
• Complaints of pain on the medial aspect of the left knee
• Swelling over the knee and he now walks with a limp
PMH (Past Medical History); Nil
Drug History; taking anti-inflammatories
Social History; lives with wife and 2 sons in a 3 bedroom house
Possible diagnosis; partial tear of the medial meniscus and collateral ligament.
Collateral ligament;
These ligaments supply stability to your knee for side to side movement and even during normal walking. Injury to these areas usually occurs after a strike from the side such as a football tackle. There are two collateral ligaments in the knee. The medial collateral ligament (MCL) is located on the inside of the knee. It is the most frequently injured collateral ligament. Usually, the mechanism of injury is a blow to the outside of the knee, while the foot is planted firmly on the ground. The good news, however, is that it often can heal on its own, if properly protected with a hinged knee brace. Sometimes, an MCL tear is associated with a tear of the ACL and a meniscus tear. This is known as the "unhappy triad". The lateral collateral ligament (LCL) is located on the outside of the knee. It is much more rarely injured.
Symptoms;
• Pain over the side of the knee joint
• Swelling which can be mild to quite significant
• Knee being unstable
Treatment of collateral ligament tears;
• Cryotherapy
• Pain medicated drugs such as anti-inflammatories
• Physiotherapy
• Braces to support and strengthen the knee
• Surgery ( this is usually a last resort most orthopaedic surgeons agree that tears of the MCL or LCL should first be treated conservatively)
Diagnosis;
• A good history and physical examination will usually be enough to make a diagnosis. However, x-rays and MRI scans may be carried out to confirm diagnosis.
Medial meniscus tears;
The medial meniscus on the inside of your knee rests between the femur and the tibia. It is made up of tough cartilage and conforms to the surfaces of the bones upon which they rest. Together with the lateral meniscus. The meniscus function to distribute your body weight across the knee joint and improve stability of the knee joint. The two most common causes of tears in the meniscus are traumatic injury (most commonly seen in athletes) and degenerative processes. The most common mechanism of a traumatic meniscus tear occurs when the knee joint is bent and the knee is then twisted.
Symptoms of meniscus tears;
• Knee pain
• Swelling of the knee
• Tenderness when pressing on meniscus
• Popping or clicking within the knee
• Limited motion of the knee
Treatment;
• Cryotherapy
• Injections of cortisone (type of steroid)
• Surgery (meniscal repair or meniscectomy)
Diagnosis;
• A good history and physical examination will usually be enough to make a diagnosis. However, x-rays and MRI scans may be carried out to confirm diagnosis. An x-ray can be used to determine if there is evidence of degenerative or arthritic changes to the knee joint. The MRI is helpful at actually visualising the meniscus. However, simply ‘seeing’ a torn meniscus on MRI does not mean a specific treatment is needed. Many people can live with meniscus tears. It is only when the meniscus tear becomes symptomatic and interferes with activities that surgery to treat the meniscus tear should be considered.
What would you be expecting to get from subjective assessment;
• How the injury happened- from a traumatic injury occurring from the side i.e. tackle in football as stated in the case study
• Pain gets worse during any type of activity but eases with rest
• Some difficulty in walking - the knee feels like it is going to ‘give out’
Objective assessment;
Looking for any swelling, bruising, deformity or posture
Check ROM at knee joint expecting some limitation
ROM that occurs at the knee joint is;
Flexion
Extension
These may be checked with active, passive or resisted tests.
Special tests;
• McMurray Test; patient supine with test knee completely flexed. To test the medial meniscus, laterally rotate knee and passively extend to 90 degrees while palpating joint line. To test the laterally meniscus, repeat test with the knee in medial rotation. Positive sign; a snap or click.
• Apley's Test; patient prone with knee flexed to 90 degrees. Medially and laterally rotate tibia- first with distraction and then compression. Positive sign; pain
• Anterior drawer test; patient supine with hips flexed to 45 degrees and knees flexed to 90 degrees. Stabilize foot. Apply posterior force to tibia. Positive sign; tibia moves more than 6mm on the femur
Other Tests; you might want to observe your patient during walking or on the stairs
Case Study 4- Muscloskeletal
Paul McMaster is a 30 year old delivery van driver who overbalanced at work whilst loading parcels into his van. He sustained an inversion sprain of the left ankle 3 days ago and has a severe sprain to the lateral ligament complex of the ankle. At present it is difficult to diagnose precisely as the ankle is very swollen/bruised and painful on certain movements and he requires crutches to walk. There is No Bony Injury to the ankle, but he is keen to return to activities as soon as possible. He has a pronounced limp and in not weight bearing evenly through the ankle, showing obvious pain as a result. He lives with his girlfriend in a 2nd storey flat.
Subjective assessment
30 year old maleDiagnosed with inversion sprain Pain when weight bearing on injured leg and requires crutches. PMH - NilDH - NilSH - Working as a delivery man, keen to return to activities as soon as possible.Lives with girlfriend in a 2nd strey flat.
History of present condition:
3 days ago-overbalanced at work while loading parcels into van.
Twisted weight-bearing plantarflexed foot sustaining an iversion sprain to left ankle.
No breakage or fracture.
Expected Signs & symptoms:
Severe sprain-
Complete tear to muscle.
significant muscle weakness and severe loss of function.
Severe pain followed by no pain.
Minimum to no pain on isometric contraction.
Bruising (ecchymosis), swelling, and tenderness
Gross joint instability.
Pronounced limp in left foot during left stance of gait cycle,weight bearing causing obvious pain.
Objective Assessment: tests to determine if there is any abnormal motion at the joint which would indicate how badly a ligament has been torn.
Active movements:
Plantarflexion – 0-15
Dorsiflexion – 0-55
Inversion – 0-20
Eversion – 0-10
Passive movements(assissted):
Plantarflexion
Dorsiflexion
Inversion
Eversion
Special Tests:
Anterior drawer sign:-
Tests lateral ligament and medial ligament integrity.
Patient prone with knee flexed.
Apply posteroanterior force to talus with ankle in dorsiflexion and then plantarflexion.
Expected signs- excessive anterior movement(both ligaments affected) or movement on both side only(ligament on that side afffected)
Talar tilt:-
Tests –in adduction tests mainly the integrity of calcaneofibular ligament but also anterior talofibular ligament.
-in abduction tests integrity of deltoid ligament.
Patient lying prone,supine or on side with knee flexed.
Tilt talus into abduction and adduction with patients foot in neutral.
Positive sign- excessive movement.
Thompsons test:-
Tests Achilles tendon rupture.
Patient lying in prone position with feet over edge of plinth.
Squeeze calf muscle.
Positive sign-absence of plantarflexion.
Gait analysis:-
Pronounced limp in left foot during left stance of gait cycle,weight bearing causing obvious pain.
Basic anatomy of ligaments in ankle
Three ligaments make up the lateral ligament complex on the side of the ankle farthest from the other ankle. (Lateral means further away from the center of the body.) These include the anterior talofibular ligament (ATFL), the calcaneofibular ligament(CFL), and the posterior talofibular ligament (PTFL). A thick ligament, called the deltoid ligament, supports the medial ankle (the side closest to your other ankle).
Ligaments also support the lower end of the leg where it forms a hinge for the ankle. This series of ligaments supports the ankle syndesmosis, the part of the ankle where the bottom end of the fibula meets the tibia. Three main ligaments support this area. The ligament crossing just above the front of the ankle and connecting the tibia to the fibula is called the anterior inferior tibiofibular ligament (AITFL). The posterior fibular ligaments attach across the back of the tibia and fibula. These ligaments include the posterior inferior tibiofibular ligament (PITFL) and the transverse ligament. The interosseous ligament lies between the tibia and fibula. (Interosseous means between bones.) The interosseus ligament is a long sheet of connective tissue that connects the entire length of the tibia and fibula, from the knee to the ankle.
What is an ankle sprain?
An ankle sprain occurs when there is a stretch or tear in one or more of the ankle ligaments. Ankle ligaments are slightly elastic, fibrous bands of tissue that keep the anklebones in place.
Depending on the severity of the injury, an ankle sprain is classified as follows:
Grade I - Pain is present, but there is minimal ligament damage and minimal loss of function.
Grade II - There is moderate ligament damage, with a somewhat loose ankle joint.
Grade III - One or more ligaments is completely torn, and the ankle joint is very loose or unstable.
Musculoskeletal Scenario 7
Musculoskeletal Scenario 7
Phillipa Hall is a 50 year old Medical Secretary who was diagnosed with Rheumatoid Arthritis 10 years ago. She had previously noticed an increasing ache in the hands and wrists which occurred intermittently. She experiences periods of worsening and improvement in pain but deteriorating function in terms of grip and wrist extension. She has also noticed a gradual decrease in strength affecting the muscles around her shoulder. She lives with her husband and teenage sons, but usually does all the domestic duties. She is finding this increasingly difficult due to her worsening condition and has consulted her GP for review of her medication. Currently she is taking DMARDS.
Important Points
• 50 years old
• Suffered from rheumatoid arthritis for 10 years
• Ache in hands (intermittent)
• Deteriorating function (grip and wrist extension)
• Decrease in strength around shoulder
• Taking DMARDS (disease modifying antirheumatic drugs)
Expectations from Subjective
Pain will most likely be intermittent
Pain will be an aching pain
Pain may be worse in cold conditions
More than one joint can be affected (shoulder in this case)
Difficulty in gripping (difficulty doing housework)
Poor mobility in extension and flexion
Worse symptoms in morning- increased stiffness
Easing factors: Resting hand and wrist
Heat
Ice to reduce swelling
Aggravating Factors: Activity of hand and wrist
Sleeping causes stiffness
Family history of RA?
Rheumatoid Arthritis Information
RA is a chronic, autoimmune disorder that most commonly causes inflammation and tissue damage in the joints.
RA of the joints is due to synovitis. As its name suggests this is the inflammation of the synovial membrane.
With time, RA can affect multiple joints (it is a polyarthritis). It most commonly affects small joints such as the joints of the hand which is relevant to this scenario.
Signs and Symptoms
• Swelling around the affected joint is commonly observed.
• RA causes joints to become tender and stiff reducing their movement and function.
• A warm sensation can sometimes be felt by the patient in the joint affected.
• Weakness in the joint and surrounding muscles can be observed
• Clicking and cracking noises can sometimes occur during joint movement.
• Tiredness
• Fever and feeling unwell
• Weight loss
Objective Assessment- Hand
• First observe the patient’s hand and note any deformity, swelling and bruising.
• Assess patients movement at hand. Active movements before moving to passive. Range of movement should be noticeably affected
• No special tests of the hand are really relevant here as the pathology has already been identified.
• Test power of the muscles and compare to opposite hand. Strength will be poor with extension.
• Test grip by holding your hands out with your palms flat. Ask patient to grip around the proximal phalangeal area. Too high or too low you may feel pain. Compare the two wrists
Objective Shoulder
• Oberve the shoulder. Look for bruising, swelling, redness, deformity
• Observe posture using the inferior angles of the scapulae.
• Look at active movements and compare to opposite shoulder
• Passively push past the limited range of movement to assess end feel and if more movement is capable
• Resisted tests to assess muscle power in shoulder. Resist all the GH movements. Compare to opposite shoulder
Special tests can be carried out should you feel necessary.
Due to symptoms it is most likely the rheumatoid arthritis that is affecting the shoulder as over time it can affect more than one joint. It is written in the scenario as a gradual decrease in strength of the muscles around the shoulder.
Normal Hand ROM
Wrist
Flexion 0-75
Extension 0-75
Radial Deviation 0-20
Ulnar Deviation 0-35
Pronation 0-75
Supination 0-80
Fingers
Flexion MP joints 0-90
Extension MP joints (active) 0-45
Proximal IP joint flexion 0-100
Distal IP joint flexion 0-80
Thumb
IP joint Flexion 0-80
IP joint extension 0-20
MP joint flexion 0-55
MP joint extension 0-5 passive
A noticeable decrease of mobility is a sign of RA and most movements will have decreased mobility depending on the affected joint.
Wrist Anatomy
She experiences pain when extending the wrist. Here are the tendons and muscles involved:
Extensor carpi radialis longus
Extensor carpi radialis brevis
Extensor digitorum
Extensor carpi ulnaris
Extensor indicis
Extensor pollicis brevis
Extensor pollicis longus
Extensor digiti minimi
She experiences pain and has noticed a decrease in strength when gripping so these are the muscles and tendons involved:
Flexor digitorum superficialis
Flexor digitorum profundus
Flexor digiti minimi brevis
Lumbricals
Diagnosis
Rheumatoid arthritis can be diagnosed in a number of ways. X rays can be taken of the affected joint to check for RA. However, X rays provide inconclusive evidence at the developing stages of the condition and other methods of diagnosis must be used.
When RA is suspected, blood tests can be taken to test for a specific RA antibody.
The treatment is not needed but I added it if you wanted to mention a few things in the exam
There is no cure for RA but it can be managed in several ways.
• Physiotherapy treatment will encourage exercising the affected joint in an aim to increase mobility. Exercise is a core treatment in RA irrespective of the age of the patient.
• Pain relieving drugs can be taken to reduce the pain sensation in the joints. Most commonly used are paracetemol, ibuprofen and in more severe cases codeine and tramadol.
• Anti-inflammatory drugs can also be taken to ease swelling around the joint capsule.
• Steroids can be taken to reduce swelling but it is not recommended for routine use due to the possible side affects. These include weakening of the bone marrow (osteoporosis), thinning of the skin, weight gain and muscle wasting.
• Disease modifying antirheumatic drugs (DMARDs) ease symptoms but also reduce the damaging effect of the disease on the joints. DMARDs can improve the prognosis of the patient after several weeks as they have little immediate effect. They are best taken at the early stages of RA.
• Certain food supplements can be taken to control RA. They do not work with all patients but some find it helpful. Glucosamine can be taken to slow the progression of joint degeneration. It can also relieve pain and improve function. Tropical capsaicin can also be taken to alleviate pain. Again the effects and success of taking the supplement can vary.
• Heat can be used to ease and relax the muscle tissue around the joint. This can ease pain for a short period of time but can also increase mobility slightly as the muscles involved are relaxed from the heat.
• Ice can also be used but it has a different affect to heat. Ice can reduce swelling around the affected joint to ease pain and improve function slightly.
Subscribe to:
Comments (Atom)

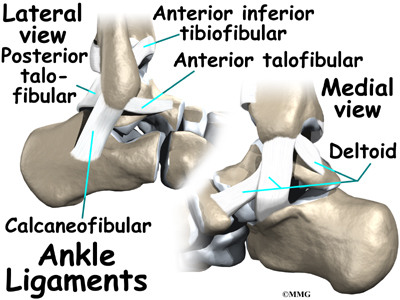
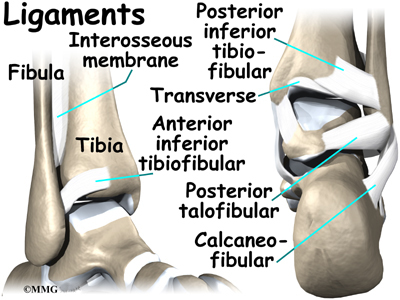